December 31, 2015

My First DXA Module - JWPlayer - Steps by Step - Content Delivery

In last post, i detailed my experience on the CMS Part of the DXA module. In this post i will explain the CDA part

Visual Studio Solution: In Asp.net MVC each Module is separated by respective Area in the project. There are different ways to set your solution.

  • Use exiting DXA project and create required Area using Mvc ' Add Area..
  • You can use Visual studio extension for DXA to add, required files e.g Registration and Modle classes.
  • I find it easy to add above in existing DXA website, as it make me easy to debug and go ;)
Structure of  this plugin
so when we add new Area all the above folders, except Entity are automatically created along with web.config and JWPlayerAreaRegistration.cs file. 

Step by Step changes:
  1. Create Model class which will be used in the ViewModel and carry the data from component of JWPlayer Schema.
so here i have mapped all fields of schema to this ViewModel.

2.  Create view which will use above model and render the JWplayer Video. the name of view should match with one given in CT's metadata.

3. Update JWPlayerAreaRegisteration.cs so that it inherits  from  Sdl.Web.Mvc.Configuration.BaseAreaRegistration class
and overrides the RegisterAllViewModels method to register above view and view-model in view-registry. see below image , This is again very important step


 Now time to compile and test the module.

You will see following output.

You can see JWPlayer logo on top the the video. this is there as i have not used any valid key for it.

So we are done with the working DXA module step by step. 

Now time to bundle this module using Powershell scripts and submit to the Gallery where people can use and improve it. 

I will also send pull request on GIT to open source the code.  

I have listed out the features  for next version, which i will definitely work in 2016. Stay tuned for that.

Happy new year!!


My First DXA Module - JWPlayer - Steps by Step - CMS

DXA Modules allows us to extend its Functionality via providing new modules. Making separate modules for functionality gives flexibility & re-usability. Independent release of the modules can happen without concerning about the main DXA version and developer can develop their modules and publish at DXA Module repository.
I was very impressed by the DXA modular approach and framework when Bart shown us the slides in last MVP meet. This modular functionality is near similar to WordPress plugin world, where you can download thousands of plugins. Right now downloading in Dxa is not that smooth because nature of the complexity of Tridion vs WordPress and its just start, but i hope SDL will make it smoother in next releases and Alchemy.
btw wordpress also has JWPlayer plugin :)

Each DXA module has primarily two sections.

  1. CMS
  2. CD
CMS Part
  •  Define module's folder structure
  •  DXA has a predefined structure for putting all the building blocks of the module.  
  •  For each new DXA module, we need to create a new folder in Modules Folder
  • The name of folder is usually module name.
  • In Admin folder of module(JWPlayer) , a component of Module Configuration schema is created  
  • Site Manager usually contains Schema and Template to be controlled by Site manager.
  • Settings also have similar folder as in Module but it just contains component etc for defining any settings.

Module Configuration: This is the Mandatory details of the Module

 
  • Module Name: Defines a unique name of this module
  • Version to track any updates in future
  • URL for additional details
  • Active: never used it, but to enable disable the module
  • if  you module is dependent on any other module, so far i have seen only Core here
  • Any settings component is attached here in "Further Configuration section"
  • After setting there is resource section. if you have any resource do attach the resource component there.


i have attached JWPlayer Configuration Component of JWPlayer Configuration Schema, which contains one field for JWPlayer Key.

Schema
I have created another schema "JWPlayer"


This schema will be used by Editor to define the JWPlayer Video components with required Video details and attached to desired page.
Component Template:
I have created a new CT (JWPlayer) to be attached with component of above schema  and following are the metadata settings of it


Entity View Name : Value for Area and View name which will render this CT.

Region Name: Section name of webpage where this CT needs to be rendered. i wanted to render it on home page so used this. but can can be any new region as well.


So we are done with CMS part of the Module. now time to publish.

December 23, 2015

How to use page-type

Continuing from my last post on Page type Demystified Tridion. in which i explored different options in page type creation. In this post i will explore how to use already created page type. 


Enter into Experience Manager and click on new Page in Ribbon-Bar, you will find a new slide-out option on left with list of all page-types available in system you can find-out page type created in the last blog post.

you can see name and description which were entered while creating the page type. so while creating page type i  did not entered the Example page URL, to show the use of that i have entered my blog URL in that now. it should be actual page which is similar to the page being created.

In the Page Types list, if you single click any of the page type. it will start loading Example page on right side in a iframe, to visually show user what kind of pages can be created with it.

You can either double click or select apply to create page from the desired page type. you will see following screen for entering the page details.


Few things to notice on this screen:
  1. Page location: so if you are on a page \home\discovery\discovery.html. and creating a page from page type, it will copy same location in the Page Location textbox by default, though you can change it 
  2. Configure Folder for Components: This option will only be visible if you have defined custom folder path for your component presentation. Check my previous post where we defined the location.
    You can override previously selected location for all the component presentation here, after clicking on Configure Folder for Components.
keep in mind publication will be chosen from the blueprint context defined for this publication (where you are creating this page)

so when we defined page type, we selected folder locations for all components. at that time interface shows folder of that publication only where page type was being created.

But now when component are created , publication is chosen from blueprint context, but folder path(sans publication) is same which you selected while creating page type.

now if that folder does not exist in that context publication(that might be local folder). page creation fails. so you have to little careful here that folder location exists.

After you click on the "Create Page" it may take some time depending upon the no of components on your page. After all the components get created, Xpm will show the page with Sample data which can be changed by editor happily as per need.

Again mentioning only first level of components will be created any component link in sample component will be used as-its. 

December 21, 2015

Page type Demystified Tridion

Page type is very good feature which powers editor to create same type of pages on fly without going into level of components and then assembling the page, but when i started searching for material on internet for it, found very few posts and official document also limited. I am writing this blog to put my understanding for page types i got so far.

Set your Blueprint context right -:
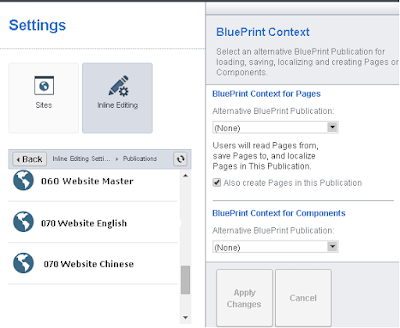
To reach this setting Open , CMS and on top right corner click Hamburger menu -> settings -> Inline editing

We need to define the publication for the pages and components where those should be created in the publication hierarchy.  This is very great feature, you can do this setting for each of your website. e.g you want to create English content in your Content-english publication and Chinese in Content-Chinese folder. so you need to select your website from left panel, where you will select the website/publication where pages needs to be created.


on right side you will select two blueprint Content
  • for Pages - if you want to create pages other than this publication e.g some master publication choose that publication  in "Alternative Blueprint Publication"
  • for Components - if you want your components to be created in different publication which is obvious, please select that master publication here from the drop-down "Alternative Blueprint Publication"

    Now time to create the page type.
Create a new page 
Create a new page and give it name and select PT as process. Now select check-box
"Use this page as PageType"

it will show you two another options as show in below pic.
  •  In page type description give the description, it will show as subtitle of the page type in XPM.
  • Example page URL, so that Editor can see if he use this page type how will my page look after creating, XPMopens this URL in iframe at time of page creation.
After doing above now click on Component Presentations tab and add a new component presentation. ie. Component and Component Template.

now select newly added component presentation on left side, you will observe a new tab after component presentation tab ie. "Page Type Settings"

here we need to set name of the component, folder location of component and behavior.


in page type settings you will observe two Radio
  • Include this Component presentation - Use this settings if you want to include same component on all newly created page. e.g you have shared banner component. which you want to repeat for all the pages. select this option. 
  •  Include.... that contains a copy - Use this setting if you want new component on newly created page. select the folder location and provide a name with placeholder as per requirement. so a copy of the selected component with new tcm-id will be created in above selected location. content for which can be updated by Author in XPM. this is best candidate for product or page specific components.

    Furthermore this location can be changed (if required) during page creation.

    important thing to notice you are giving setting for only component, same component template will be applied which is selected on left side.
Some desired features
  • When a copy of a component is created , any  linked components' copies are not created, so . but you have to create new linked component manually in CMS and then link it in form view. so it makes some time XPM unusable if you have many linked component are used in your component model.
    e.g Creating Carousel is nightmare using page types.
  • No option for setting folder location for metadata linked components, so any linked component in page type metadata will be used as its. no option to create replica and location of that component.
and few more to be added later.

now  we are done with the settings for page types. now time to use this Page-type

December 19, 2015

Comparison of different DXA version.

DXA new versions are being released with quite a good pace, i think each quarter they are releasing new version. so far 1.01, 1.1 and 1.2 are released. Bart & his team doing very remarkable job in it. when i first time used DXA 1.01 there were numbers of bugs in it, but in each version its improving. its making development very rapid.  I am here trying to summarize what each release of DXA brings to table.


DXA 1.01 (STRI)

DXA 1.1

DXA 1.2

DXA 1.3 (not released yet, may change)

Release Date

Sep 2014

Aug 2015

Nov 2015

 Expected (Jan/Feb 2016)
DD4T version1.311.312.02.0

Tridion Version 

SDL Tridion 2013 SP1

SDL Tridion 2013 SP1 HR1

SDL Tridion 2013
 SP1 HR1

SDL Tridion 2013 SP1 HR1 & SDL WEB 8

.net framework

4.5.1

4.5.1

4.5.1

4.5.2

Official Modules
  • Google Analytics
  • Search
- GA
- Search
- Smart Target
- Media Manager
- GA
- Search
- Smart Target
- Media Manager

Asp.net MVC MVC 5 MVC 5 MVC 5 MVC 5

Changes


  • ·Improved support for creating Modules
  • ·Solutions changes and Refactoring of code
  • Better Performance
  • Improvements in handling Media Items.
  • Page Includes as Region
  • No separate installation of Node js required, its included.
  • Html-design splitted into two files , 1 for fixed grunt modules , 2 for app related css, js etc.
  • Updated Syntax for rendering region and markups


December 13, 2015

Donut caching using Outputcache with DXA

Donut caching is the best way to cache an entire web page except for one or more parts of the web page. unfortunately post asp first version asp.net do not provide any good way to implement it.

I required to implement it in my project as i want all CMS pages to be cached except for the dynamic login and other sections. As DXA 1.2 has single method to process pages in Page Controller, and DxaEntity for component presentation. so if you apply OOTB Asp.net Outputcache attribute to it. it will cache entire page including the dynamic sections.
While searching for solution i come across the DevTrends' library which enables Donut caching Asp.net mvc solutions. i downloaded it from NuGet. using "install-package MvcDonutCaching" but could not use as it is because this library Serialize all the parameters passed in htmlAction method.


MvcHtmlString result = htmlHelper.Action(actionName, controllerName, parameters);


Code Change in Library
but problem with this is, the last parameter contains object of DD4T's ComponentPresentation class. so serialization fails while complaining about "no knowledge of this class". so i had to download the Source code of this library and add the reference of "DD4T.ContentModel" and then provided class in question as known type of Serialiser.

public ActionSettingsSerialiser(){_serialiser = new DataContractSerializer(typeof(ActionSettings), new[] { typeof(RouteValueDictionary),typeof(ComponentPresentation)});}

Code Change in DXA Library
Donut Library provides overloads of all methods in Helper.Action method, it provides a additional Boolean parameter which accepts whether to exclude the view from cache or not.
  • Refer the namespace of the library in Sdl.Web.Mvc.Html.HtmlHelperExtensions
  • Add optional parameter in following method.
    - MvcHtmlString DxaEntities(this HtmlHelper htmlHelper, int containerSize = 0, string excludeCache = null)
  • And following changes in  DxaEntity  
  • public static MvcHtmlString DxaEntity(this HtmlHelper htmlHelper, EntityModel entity, int containerSize = 0, string excludeCache=null)
  • bool excludeFromCache = (mvcData.ViewName.ToLower() == (excludeCache!=null?excludeCache.ToLower():string.Empty)); 
  • MvcHtmlString result = htmlHelper.Action(actionName, controllerName, parameters,excludeFromCache)

so i have added a optional parameter in the DxaEntities and DxaEntity Method, if any of the view is required to be excluded from the parent cache, just provide the name of the view.

It will match the viewName if it matches, then true is passed in the HtmlHelper.Action method and exclude this view from the cache.

Change in PageController or you can override the method.
[DonutOutputCache(CacheProfile = "Cache1Hour")]
        public virtual ActionResult Page(string pageUrl) 
web.config settings.
    <caching>
      <outputCache enableOutputCache="true"/>
      <outputCacheSettings>
        <outputCacheProfiles>
          <add name="Cache1Hour" duration="0" location="Server" />
        </outputCacheProfiles>
      </outputCacheSettings>
    </caching>